Pages

Saturday, 27 October 2012

Giveaway Winner

I apologiese about the late post - my laptop crashed - well and truly.
Over the last week I have been slowly (very slowly) trying to transfer by docs and photos to other storage devices. I will be shopping for a new one tomorrow, so I have no projects this post.
Stay tuned though.

But back to the Celebration Giveaway. 
Drum roll please. The lucky follower who will get this great package is Leeanne.
Congratulations.

Thankyou everybody for your support and lovely comments.


Tuesday, 23 October 2012

Elegant For You

Recently I was asked to be a Guest Designer for Sawyer's Place.
They manufacture and sell beautiful Washi Tapes.

I received my Design Package on Thursday and was so inspired, I immediately got to work.

Today's card uses 3 of Sawyer's Place Washi Tapes - Pink Damask, Bold Black Flowers, and Black Art Deco.


I created backgrounds with the Pink Damask and Black Art Deco.
I then die cut a flower out of the Black Bold Flowers with Donna Salazar's Carnation Creations Die.
I finished it off with some ZVA Pearls and Flowers and a Rhinestone Brad.

Sunday, 21 October 2012

Birthday Giveaway Update

Thought I would give another teaser of the Celebration Giveaway contents.


Only a couple more days.
Good Luck to everybody.

Celebrate

I decided I couldn't wait any longer to post a new layout.
This one is created using Artful Delight's September Kit. The colours matched this photo amazingly well.
I prepped the background before I did anything else. 
I whitewashed the background with watered down white paint, and focused a little more on the edges.
I then glimmer misted where I was planning on building my layout.
I also inked all the edges with Vintage Photo Distress Ink.


Thankyou for stopping.

Wednesday, 17 October 2012

Birthday Giveaway

Hello Everyone.
I mentioned a giveaway in my previous post, and here it is.
I thought, since it is my Birthday month, why not have a giveaway.


What better way to celebrate than by giving away this celebration pack of Goodies.
There are 12" x 12" sheets, A4 Vellum Sheets, Stickers, Rub-Ons, Tags, Brads, and Ribbon.
And of course, it can't be a birthday without some flowers and bling.
Please note - this is just a taster, not everything is shown in this picture.

To be eligible just become a follower, then leave a comment below.
I will draw one lucking person on Friday 26th October.

Good Luck and Thankyou Very Much for Visiting.

Monday, 15 October 2012

Bright Eyes

Wow. Can you believe it is October already.
I feel like I have neglected my blog followers over the past fortnight, and I apologiese for that.


Here is a layout I created with lots of Jillibean Soup products, specifically the Winter Tortellini and Spinach Soup and Grandma's Lima Bean Soup kits. I have since added the date and my journalling in the spaces provided.

Thanks for stopping by today and keep and eye out.
I will be having a giveaway shortly.

Friday, 28 September 2012

SSD Monthly Christmas Challenge

For this month's Sassy Studio Designs Monthly Christmas Challenge, we had to create a
Gift Card Holder.
 
 
I used the Chrissy Prom Sassy.
When I saw her, I knew I wanted to create something Christmasy with her.
I first coloured her using my Promarkers and fussy cut her out.
I used Jillibean Soup's Winter Tortellini & Spinach Garlic Flakes and Frozen Peas Paper, Winter Tortellini & Spinach Pea Pod Die Cuts and Soup Staples II Red Salt Paper (love these).
For the ribbon, I used May Arts Metallic Velvet Ribbon (love the sparkle).
 
 
I kept the inside fairly plain with just a hint of embellishment.
 
Head over to Sassy Studio Designs to purchase Sassy Images
or just to get some great inspiration.
The DT members are Fantastic.
 
Happy Crafting Everyone.

Monday, 24 September 2012

Sassy Studio Design New Release

Hello Everyone.

This week is Sassy Studio Design's New Releases for the month.
There are some gorgeous and playful images for Halloween.

Be sure to hop on over to Sassy Studio Designs. They are having a blog hop and they are randomly selecting winners to receive 2 free images. All you have to do is leave a comment.

For my card I have used the Sassy Pin Up Cat. I tried something a little different with colouring and thought she fitted the Paris scene perfectly.


Now, check out what the other designers have done.
Next in line, Jovan.
Day 2 Hop Order:
Angela (you are here)

Monday, 17 September 2012

Sassy Sketch & Cupcake Inspiration

So my first design for Sassy Studio's was this lovely card (I might be a little biased).
I took inspiration from both their Sketch and Cupcake Inspirations Challenges.

I loved the colours in the cupcakes, and thought the colours would transfer beautifully to this Rapunzel Honey image.

Ok, I guess I may have interpreted the sketch a little differently. I turned it onto a 90 degree angle and started from there.


Now it's your turn.
Check out the Sassy Studio Design Blog for some Inspiration and some amazing challenges.
 
Thanks for stopping by.

Guest Designer for SSD

How exciting. I have been chosen as this month's Guest Designer for Sassy Studio Designs.
There are some great projects coming up, so stay tuned.

Friday, 31 August 2012

Snapshot

This is one of the few picture I like of me - so I just had to scrap it.
The sentiment is there to remind me to find beauty in the everyday.


 I have entered this into Two Peas in a Bucket's Teresa Collins Challenge.

Our Angel

This is a picture of our angel at only 6 weeks.
Wow - how time flys.
This is my 4th Scrapbook page.


I have entered this into Two Peas in a Bucket's Carta Bella Challenge.

Tuesday, 21 August 2012

Flash

This is a series of photo's taken when my daughter discovered the flash on Daddy's iPhone.
She LOVED it.
Again I used Artful Delight's August Kit.


I would like to enter the 1st picture into Delightful Inspiration's (Artful Delight) August Scrapbooking Sketch - ASC #23.

Thank You

I can't believe it is past the middle of August already.
Here is a lovely (even if I do say so) card that I created using the Artful Delights' August Kit.


Love the colours and the button.
I would like to enter this in Delightful Inspirations's (Artful Delight) August Card Sketch - ASC #23.

Monday, 6 August 2012

Happy Haunting

Tried my hand at making a Halloween Card.
I quite like it.
I added some Pumpkin Smooch on all the Flowers and Leaves.


I would like to Enter these into the following challenges.

1. Sassy Studio Designs September Guest DT Call
2. Paper Play Challenges - Week 31, Layer it up
3. Divas by Design - Challenge 46 Flowers


Cupcakes Make Everything Better

This was such a fun card to create.
Mmmm, lots of layers.


I would like to Enter this into the following Challenges.

1. Studio Calico Sunday Sketch 07/29/2012
2. Studio Calico Weekly Design Sketch 07/30/2012
3. Paper Play Challenges - Week 31, Layer it up
4. Moving Along With the Times - Summer
Hope you like it.

Monday, 23 July 2012

Beautiful: Inside & Out

I thought I might make a nice summery card.
I also wanted an encouraging greeting for the recipient.


The image is from Sassy Studio Designs and I have coloured it using my Promarkers.
I lightened all the edges with Picket Fence Distress Stain to give the card a softer look.

I would like to Enter this into SSD's August DT Call.

Friday, 13 July 2012

Handmade Paper Fun

Here are some projects I have made with different handmade papers.

The first project is a mini album I made. It is a combination of handmade and recycled materials.
The cover is made by wraping handmade paper around recycled cardboard.
I inked the paper, embossed, then inked again before spritzing with some homemade glimmer mist.
I then wrapped my paper around my cardboard (I made this 2 layers thick for strength and stability).
I covered the inside with recycled paper and attached my pages using Laura Denison's (Following the Paper Trail) Stack the Deck binding.


The next are combinations of handmade papers mixed with cardstock and recycled materials. I love laying all the different layers as it provides great dimension and texture.


Wednesday, 11 July 2012

Little Miss

This is a card I made for a swap.
I thought she was soo cute.


Project Recipe Card:
Stamp:
Cardstock: Whisper White, Wisteria Wonder, Island Indigo, Calypso Coral by Stampin Up, Bright Yellow by Unknown
Inks:
Memento Tuxedo Black & Promarkers
Embellishments:
Gold Brad, Gold Satin Ribbon, Coral Eyelet Lace & Pink Glitter
Dawn at Christmas by Nellie Snellen

Friday, 8 June 2012

Little Darlings Custom Make

This is a Little Darlings (Graphic 45) Mini Album that was a Custom Make.
I liked it so much I might make one for myself. Hehe.


Here is just a glimpse at the inside.


I can put together kits for this if anyone is interested.

Monday, 4 June 2012

May Arts DT Call

Project Five - May Arts Card.

I am sooo excited.
Some of my May Arts ribbons arrived and I just had to make a project from them.
Here is a card I made for my Mother-In-Law's birthday.
Doesn't the ribbon just make it.
I LOVE it.

Project Four - Ribbon Flower.

I received inspiration for this flower from one of those gift bows you can buy almost everywhere.
I am sure others have created similar flowers, but this is how I created mine.
I found one that was looking a little shabby and decided to pull it apart. This was the result.

First I cut a length of ribbon.
I used 49" of 1/2" blue seam binding.
As I wanted a crinkled look, I decided to scrunch my ribbon up in a ball a couple of times.


Next, I poked holes in the binding every 3", leaving 1/2" at the start and end.
I used the back of my brad for this because I thought any pulls would add character.
Of curse, if you wanted a neater look, you could use a push pin, needle, or paper piercer.


Now it's time to start looping.
I grabbed one end and created a loop. To do this I brought the remaining ribbon forward and twisted once, placing the raw edge behind. This will keep hide this edge and will be covered by the brad.


I inserted the brad through the loop in the holes I had created. I then made another loop opposite.


The loops were then turned 45 degrees and another 2 loops were made.
This creates a + or x type pattern.
This is your first layer.


I then turned the flower and created another 4 loops using the same method and offsetting each 'petal'.

Another 2 layers (8 loops) were made offsetting each.
I used a total of 4 layers (16 loops) for my flower.


Turn the flower over and spread the prongs out.
Viola, finished.


You can rearrange the petals, glimmer mist, or further scrunch the flower as you wish.

I thought this turned out great and I am sure I will be making a few more of them.


Project Three - Mini Overload.

Ok. So I have become quite obessed with Mini Albums at the moment.
This project was made for a friend. Her new baby girl was recently baptised, so I made this album for her. I have only included some glimpses here (I don't want to spoil the suprise too much), but you get the idea.
I had so much fun playing with all the bits and pieces.
I especially loved playing with the ribbons and the flowers (strewn throughout).
I hope she loves it.
Just a head's up, there are 7 images.

If anyone is interested in a kit with the items I used for this project, please email me or leave a comment.


Project Two - Curtain Magic.

The second project I created was for my daughter's room.
We found these pink organza tab top curtains on sale at Spotlight.
After walking around the store with them, I decided they needed a little dressing up.

I dug through some ribbons and found 2 different types that were perfect for this project (Sorry, I forgot to take photos of the ribbons before I took to them with a pair of scissors). The first was a string of alternating cream flowers and butterflies. The second had flowers with varying hues of purple.

I carefully cut out all the butterflies and flowers.
Once these were all cut out I separated them into 2 piles (for the different curtains).
Then, I just took my hot glue gun and carefully glued them to the curtain.
How quick and easy was that, and they look great when the sunlight hits them.


Friday, 1 June 2012

May Arts DT Call

Project One - Cards Say it All.


Well I've decided to apply for the May Arts Design Team.
They make gorgeous ribbons and as everyone knows I LOVE ribbon.

 Here is my first of several projects.

I created these cards to work around the different ribbons.

The first card uses green rafia throughout. I thought the rafia created a spring garden type feel.


The next 2 cards use the same layout, just slightly different elements.
Don't they look elegant.
I love the black and gold ribbon, it really works well.


Here's a Christmas Card I created using 3 diffrent types of ribbon - Olive, Cream and Red.
Hmmm. Love the colours.


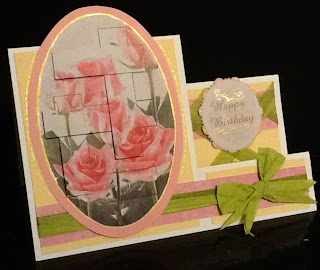
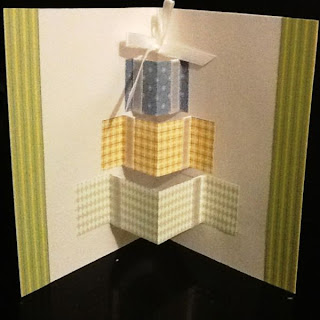
Finally, a sweet birthday pop-up card.